|
EspressoID Documentation and Sample Card Download
- Install and Register Software
- Warning: you will need an Internet connection to complete the installation process for EspressoID.
- Download the EspressoID installer from here.
- Fill in your name and organization on the registration screen.
- Fill in the serial number sent in the purchase confirmation email (Example: 12345-ABCDE-5OL12-789ZW).
- Click the Register button then the Activate Now button and your computer will contact our server over the Internet to register and activate EspressoID.
- Install Camera (Optional)
- Follow manufacturer's installation instructions
- Once the camera is installed you will need to select it as the source for images.
- On modern versions of Windows most webcams use DirectShow.
- From the File menu, choose Camera Setting -> Configure DirectShow Camera and pick your preferred camera from the list.
- If your camera does not appear in the list or if there are no DirectShow cameras then from the File menu, choose Camera Setting -> Configure TWAIN Camera and pick your preferred camera from the list.
- Depending on which kind of camera you found, DirectShow or TWAIN, select Use DirectShow Camera or Use TWAIN Camera in the File menu under Camera Settings.
- Note: A live video interface camera is preferable. Cameras without a live video interface will require you to browse to an image file on your hard drive that you copied there from the camera.
- Install Printer (Optional)
- Follow manufacturer's installation instructions.
- Once the printer is installed you can assign that printer to a Card Template using Printer Settings from the Template menu.
- Printer settings are held in each individual Card Template, therefore, different Card Templates can be set up to print on different printers.
- Note: Printer settings and terminology vary between printer manufacturers and, therefore, may require trial printing to find settings appropriate for your required card output.
- Tab 1 Overview - Define Fields
- Use to assign static or variable field names, create static text and import logos.
- Static Fields, when added to a card template, remain the same on all printed cards.
- Variable Fields, when added to a card template, will change depending on the Card Holder. There are 3 data types for fields (Text, Image and Barcode)
- We suggest keeping the First Name and Last Name fields as these are used to name the photos you acquire from your camera.
- See below and notice that there are automatic help notes under the data entry screen. This feature can be turned off and on by selecting the circled arrow to the right.

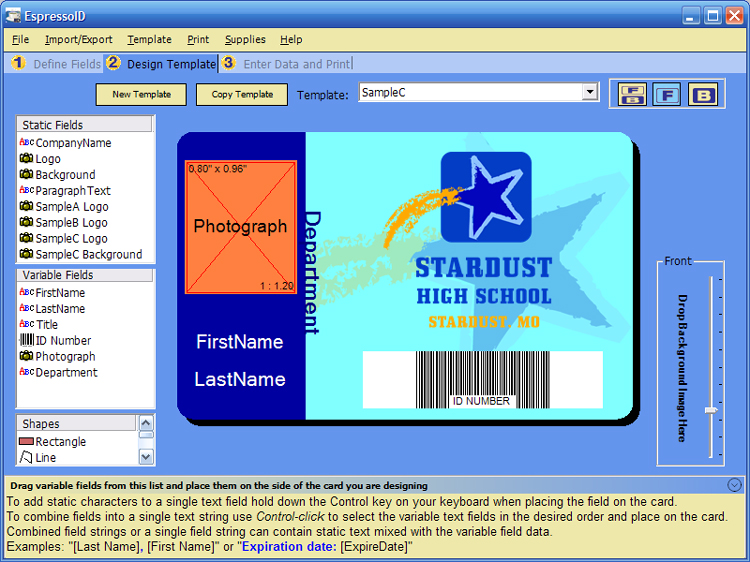
- Tab 2 Overview - Design Template
- Use to create, design and manage multiple Card Templates.
- Simply drag your database fields onto the card and drop them. Right click the field once it's on the card to set properties such as text attributes and color. If you are using the magstripe feature, drop the field onto the magstripe and right click it to assign it to track 1, track 2, or track 3. Combined field strings or a single field string can contain static text mixed with the variable field data.
- Combined field strings or a single field string can contain static text mixed with the variable field data.
- To create a combined fields use control-click to select the variable text fields in the desired order and place on the card.
- To add static characters to a single text field hold down the Control key on your keyboard when placing the field on the card.
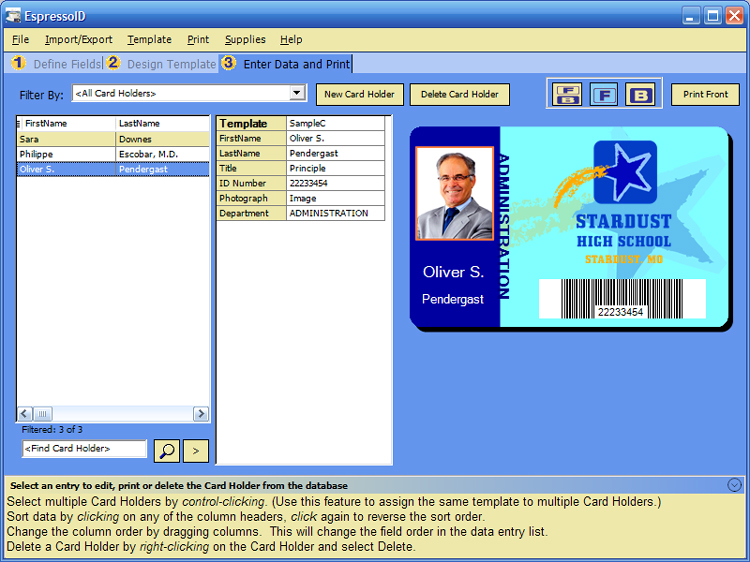
- Tab 3 Overview - Enter Data and Print
- Use to add, edit or delete Card Holders and print finished cards.
- Click New Card Holder button
- Select a Template in the center section to use for this card holder
- Fill in the rest of the data for this card holder
- When you click on any field that has an Image type you can select to:
Acquire an image from your camera or scanner
Browse to an image on your hard drive
Crop the existing image if you would like to use a subset of the selected image
- Use the buttons on the right to control which side(s) of the card are showing
F/B will show both the Front and the Back of the card
F will show just the Front of the card
B will show just the Back of the card
- Click the Print button to print the sides of the card that are currently visible
Download Template Card Samples
- Download the file below to your desktop. File name:"Sample Card Templates.fzr".
- From the Import/Export menu select Restore Card Holders. In the file open form navigate to the desktop where you saved the "Sample Card Templates.fzr".
- Click the Open button on the file open form and the sample card templates data will replace your existing data.
Note: The sample cards are stored in an EspressoID backup file. Restoring this backup file will replace all the cards, data and images in your EspressoID installation. It is very important if you are a current user with existing template designs and cardholders that you back this data up first. The Sample Cards Download was not intended for existing users but to help new users get started using EspressoID.
Download Sample Cards (File size is approximately 871KB)
|